Wednesday, September 9, 2015

Effectively Focused: 3 - Summarize

Previous Post - 2: Categorize - group like items together


Principle #3: Summarize

Objective:  Summarize the end goal or tell a story that will help reach your goal. This week will introduce the basics what you should write down on your sticky notes and when to expand and break out your ideas into small pieces.


Summary

The sticky note real estate of 3 inches by 3 inches insists on brevity. So, what to write?


The very simple summary I encourage you to write:
  • Write the idea or end result of what you hope to achieve
You can add a qualifying adjective to give you even more clarity. I don't encourage using the verbs. This will come later in the Principle #5: Time Box phase as you are planning out your week. In short, use the noun to identify the end result you are hoping to achieve and summarize it. Actions (the verbs) can be endless. A final end result puts clarity and definition about what actions you need to take (or not take) in order to achieve there result.

And since examples are better than more words, here are some samples of how I use my sticky notes. 

Examples:

In thise case there are no verbs, even in the detail section.  


The pink sticky note below is from my Home Energy Drain project of reviewing all items, purging, organizing and storing them for use. The blue sticky note is from my weekly cleaning list. I recycle this list for each week instead of checking it off and tossing it. I identified the tasks I needed to do in the task section.


A note on the sticky notes: depending on whether I use the sticky notes in my project book or on the wall version of the Backlog and Queue, I use the dividing line on each sticky note to help organize the information I put on the sticky note. The smaller side is where the Summary goes, the side with more room contains details or tasks.

One other little detail is that I like to stack the stickies in neat little "lists" and by utilizing this section, I can stack them neater. 

For the wall version, I put the Summary on the bottom of the sticky note so it will stack neater and the sticky notes won't fall over. 


For the book version, this is how I write the summary.


You will likely circle between categorizing and summarizing your work. You may end up making an entire category out of one of your stickies after you are able to get more clear about what you are trying to accomplish.

Again, keep your summaries as simple as possible.


Next Post - Principle 4: Prioritize - focus on work that aligns with your values and learn the art of saying "no"


Saturday, September 5, 2015

Effectively Organized: Finishing up my master bedroom

I've had this post sitting in my queue for a few weeks and it's time to publish it. I took pictures of my bedroom now that it's "together" to a certain extent, but I'm learning some design principles as I go. I'm trying to keep things modest, and everything I have in this room (except for my mattresses) is second-hand, stuff from mom's overflow, Craig's list, a piece is from my childhood bedroom set repainted, or a thrift store. 


Since I did this post, I've already moved things around. I have a new dresser in place and moved this pretty dresser I painted to the upstairs office to serve as a printer stand and house office supplies. I've cleaned up my office in stages and now the office is finally in photo-worthy. (I'm not embarrassed to have it in pictures.)


I like how it's coming together, but it still felt "off" to me until I realized the scale is off for the room. I have 10-foot ceilings and tall windows and I'm using furniture designed for a regular, smaller room. I'm sure any designers following this blog might be cringing... I'm learning! I like the headboard for now, but eventually, I'd like to get a white farmhouse bed. I'm tempted to tackle Ana White's Farm House Bed as a learning project. Maybe sometime in 2016. 


I really love the bohemian vibe in this room. I've swapped out the lampshades for some plain white ones as it was getting too much blue in here. The dresser on the right side of the bed is from my childhood bedroom set. I sanded this down to get a natural color top (with remnants of the original deep evergreen stain) and painted the bottom a shade called Charleston blue. I'm using multiple shades of blue in my room to mimic the multiples shades of blue, aqua, turquoise you find in water.


So, I was happy with these photos and just wanted to publish even though things have already changed. :-)

Wednesday, September 2, 2015

Effectively Focused: 2 - Categorize

Previous Post1: Capture - write everything down


Principle #2: Categorize 

You will probably be circling a bit between #2 Categorize and #3 Summarize as you figure out how to organize the information you just captured. I encourage the categorizing first as when you summarize you will also be color-coding what you categorized if you are using the Sticky Note PM posters, project book, or stickies. 


Once you have a good chunk of stickies and have emptied your brain of the clutter of things you need to accomplish, the next pass is to group and categorize the items. Don't feel obligated to use every single column. Once you start getting organized, it's easy to go overboard and try to categorize and group into many many groups. Gentle reminder: simplicity should be a mantra as you work through your processes. There are two recommendations I give when grouping:
  • Don't create too many categories. Keep it as simple as possible.
  • Leave some open columns. This allows yourself some flexibility if you have to break groups out into smaller groups. 


The Backlog

This list you have captured and are now organizing is known as a Backlog. The project in this post is my "Energy Drain List," which is basically a list of projects and household things I need to do to make my home as homey, organized, and tidy as possible. It's a big project.  This is this project's Backlog. Below is the first pass at broad strokes of categorizing. The project is "Energy Drain" which is titled on the left side. I've been using Marie Kondo's methods of streamlining and organizing my home and studio from her book, The Life-Changing Magic of Tidying Up: the Japanese Art of Decluttering and Organizing(Details on what I love about her methods in a future post.) I roughly grouped the work into these four categories:
  • Personal KonMari
  • KGS KonMari
  • House Projects
  • Cleaning
Backlog - Wall Poster


Backlog - Project Book

A sample of a single category of the Backlog in the Project book.


Color-Coding

Once you are satisfied with your groupings, you can go to the next step of aligning the groups into a color. I'm a little OCD with my tasks and like neat (but flexible!) lists. I've already written things down on the color-coded stickies, but you may want to hold off (or not) until you've gone through  Principle #3: Summarize.

Here is the color-coded version:


More Grouping

Normally I would recommend stopping with the above color-coded version of this project. However, the beauty of this system is the flexibility and doing what makes sense to you. In my case, I want to put a deadline on the majority of these tasks. There was a grouping of tasks under House Projects that required a significant investment of time and I wouldn't be able to finish them by the target date. So, I separated the House Projects and created a group called Maintenance. 


Don't feel committed to the categories you create. I change the categories as much as I need to in order to feel comfortable which will be covered Principle #7: Flexibility. Adapting to change is another core principle of this framework. Keep tweaking things until YOU feel totally comfortable. The categorizing can feel challenging, but just remember: keep it simple.  Don't get overzealous with breaking things down into tiny categories.


P.S. - The Backlog posters and Project Books with coordinating stickies are available in the Shop.


Next Post - Principle 3: Summarize - summarize by the end result (not the action / verb)


Tuesday, August 25, 2015

Effectively Focused: 1 - Capture

Previous post - Introduction - Sticky Note PM


Principle #1: Capture 


Begin Capturing Your Ideas

How do you capture your ideas now? Do you write in your journal? Do you use lists? Do your dreams meander in your mind? Do you use your lists on your smart phone or some other technology? 


Capture Your Ideas

It is as simple as a sticky note. Really. (I've managed multi-million dollar corporate projects with stickies!) One of the first important things is to get every single idea you have swimming in your head, captured in lists, written in journals, jotted on napkins...capture everything on a sticky note. For the process of capturing, use plain sticky notes (they're cheaper). 


Why a Sticky Note? 

There is incredible flexibility with sticky notes. You can move sticky notes around with wild abandon as you collect your ideas. Also, when you change your mind and ideas grow and morph into better ideas, a sticky adapts very easily. If you have a mix of "organized" and "chaos" that works with you, you can still move your sticky notes around with easy adaptation but keep them in neat little lists. The flexibility will be addressed later in the program, but in all my research on tools, I keep coming back to sticky notes as the best tool for flexibility.


Why everything? 

Free your mind to focus on the development of the idea. Don't waste time trying to remember your ideas. Write it down. Let it marinate. Let new ideas happen and write them down, too. 

“In order for your mind to let go of the lower-level task of trying to hang on to everything, you have to know that you have truly captured everything that might represent something you have to do, and that at some point in the near future you will process and review all of it.” - Getting Things Done: The Art of Stress-Free Productivity, David Allen, Penguin Books, 2001

Go wild! Write everything you can think of. When I finally unleashed my creativity and declared myself an artist, a Creative Mindstorm drenched my mind with ideas. I am still that way only now I capture every idea I possibly can. Create one sticky note per major item. The major exercise right now is “decluttering your brain” and get it out into some tangible form. 


What Should I Write Down?

I use this system for everything I need to do: personal/home projects, my art business, sub-projects in my art business, and my day job. So, when I say write everything down, I mean, write everything down. 

Keep it High Level, Focus on the End Result, not the Actions

As for the details that you want to capture, this will be expanded on in more detail in future principles of "Tell the Story" and "Plan and Prioritize." But, to save you a little effort, don't write down every single task. This is too much detail for right now  We just want to capture high level concepts and high level projects


Keep it Handy

Keep your sticky notes or at least your journal near you at all times. Write as much as you can. Everything. Little things. Big things. Crazy things. You can toss some of your ideas if you don't like them, but I don't recommend that just yet. Hang on to everything.  You never know when a discarded idea might lead to the spark of something great.


Yes, Even Your Crazy Ideas

There is no such thing as a bad idea. When we brainstorm as teams, crazy ideas often spark conversations that light up ideas that are more realistic. Even the crazy idea might be a reality at some point in time, even if there are things that make it less realistic in the here and now. The beauty of keeping things in your head is that no one can make fun of your idea. But, you never know what might happen when you share it. Yes, you might feel a little foolish for putting it out there, but wacky ideas often are the spark for the really, really good ideas.


Where Should You Keep Everything?

Everything is fair game. You can create your own Kanban boards, Kanban project books, or you can find one of the many tools that support the process digitally like Trello, Asana, Rally, or VersionOne. In addition, I have designed fun, coordinated products in my Sticky Note PM collection. You can find a  Project Book or Backlog and coordinated Sticky Notes over in my shop.


The Backlog

This collection of ideas you have captured is called a Backlog. If you are familiar with the Agile concepts, you might recognize this term. To be consistent, I use this terminology in this process as well.


Your Project Book or Project Wall

Collect your ideas in a central location, in a Project Book or Project Wall. It can be a book, a journal, or a piece of wall art. If you create your own book, I recommend heat-laminated pages to make it easier for the notes to stick. (I tried a cold-laminating system and notes just slid off the page.) If you are using a wall system, I recommend putting an attractive poster or wrapping paper into a poster frame under plexiglass or glass. The glass/plexiglass is a good place to adhere the sticky notes.


Next Post - Principle 2: Categorize - group like items together

Wednesday, August 12, 2015

Effectively Focused: Introduction - Sticky Note PM

Sticky Note Project & Task Management
Personal Kanban / Family Kanban

What? Sticky Note Project & Task Management - the intentional, organized approach to using sticky notes to manage projects and tasks.


Who?
  • If you’re known as a Sticky Note King/Queen and you want to get a little more intentional with how you use sticky notes, this course might be for you.
  • If you want task management to be visible in your home.
  • If you are interested in blending the system with your home decor.
  • If you prefer analog project/task management over digital management.
  • Geared toward individuals and families / small teams located in the same work / home space.
  • Virtual school assignment management.
Who is this not for?
  • Those who are very satisfied with their current system.
  • Those who want a completely digital management system.


The source of the framework being introduced: The grouping of frameworks is called Agile and sprung up around the challenges related to the conceptual work of software development. The main system that is currently in vogue is called Scrum (http://scrumguides.org), developed by Ken Schwaber and Jeff Sutherland in the late 1990’s. Another version that is gaining in popularity is Kanban developed by David Anderson (http://www.djaa.com). I use a mix of these two systems in my day job as a project manager for software development teams. 

Technically, the inventors of the system eschew the term, “methodology” and to a certain degree, I understand where they are coming from. Methodology implies a heavy-handed, rigid, “you-must-do-something-a-specific-way.” They prefer to refer to this approach as a framework that allows each team and individual a lot of flexibility in their approach to managing their projects and tasks in a way that makes the most sense for them. Because it’s a framework, there is a lot of room for adaptation and customization. Every single person will use the system differently and uniquely for their needs, the way they learn, and the way they categorize. There is no right way! There are core aspects that you should strive to achieve, but the rest is up to you.

Where? Free blog e-course

When? Wednesdays

Why? In spite of all the advances in technology and being a dedicated sampler of time and task management systems, I keep reverting to sticky notes. I learned complex tools like Microsoft Project, less complex tools like the task list offered on my iPhone and I keep coming back to sticky notes.

It isn’t like I haven’t tried to be all digital. I have. What I have found with work that has been termed “knowledge work,” sticky notes provide a mental and visual balance to conceptual work. The phrase “out of sight, out of mind” applies perfectly. If I see it, I remember it and am more likely to complete it. When I started diving into the subject of project management and applying it in my professional life, I discovered a methodology that actually embraced the lowly sticky note for large, multi-million dollar corporate projects. I was hooked. I do still balance my sticky notes with digital tools, but for managing my day-to-day work and keep a big visual picture, I lean on my trusty sticky notes.

Making the system attractive: The other “why” behind this project has been an effort at making the sticky notes attractive enough to live in my home as a piece of art. Using sterile sticky notes at the office is fine. Using them at home raised eyebrows, so I sought to make the sticky notes and Kanban boards attractive with the ability to integrate into home decor. Lastly, I wanted to make this method portable, so I made a project book that mirrors my project board. You can use one or the other, or both if if you prefer, like I do.

Kanban Book: My niece's virtual classes. This allows her parents to see how much work she has without having to log in and provides a simple, visual accountability system that narrows her focus. 
Kanban Book: My personal system that I use to manage my art business in the Beach Brights colors

This program is going to introduce you to the basics of the system I use and the accompanying wall and book tracking systems.

Kanban Wall System: Product backlog - the "Big List"of stuff I need to accomplish for Kanna Glass Studios

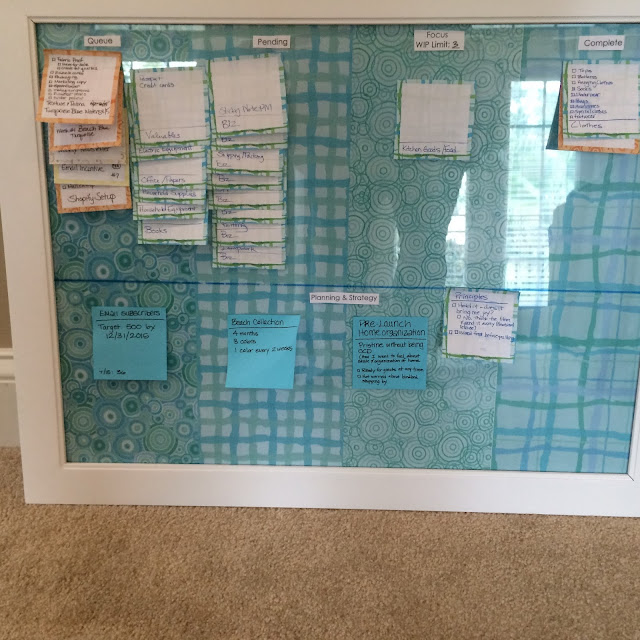
Kanban Wall System: Kanban Progress Board - a queue of work that needs to be accomplished this week, prioritized.
Four columns are Queue, Blocked, In Progress, Complete.


Next Post - Principle 1: Capture - write everything down