Friday, January 22, 2016

Effectively Organizedt: Finished studio!

Creating an inviting, inspiring studio space was a lot of work. A lot more than I expected. But it was TOTALLY worth it. I've been heads down buying furniture (all second-hand), painting it to unify the pieces, finding storage items, and organizing everything. And now I'm head over heels in love with my studio. I love being in this space. I'm ready to work.  

When I moved to Hong Kong, I hadn't planned on moving back to the US. I sold everything I owned. If I knew I was going to come back I would have stored my furniture. I have some pieces I really miss and would have loved to have in my home here in Florida. When I returned to the US, I didn't have enough energy to collect furniture organically the way I like to do it. So, I just bought everything from Pottery Barn. Then I went through another phase where I downsized again (sold the majority of the furniture I had just bought) and moved into a 5th wheel camper. Until I tired of that and moved back into a house. 

Now I'm renting a 2,300 square foot town home. I love this space. It's a beautiful home. Since I spend 80% of my time here, it's nice to have a little more space for rattling around in. I struggled to find my new style here in Florida. I missed the southwestern style I had collected over 9 years in Texas. I haven't been able to find pieces here in Florida that match that style. So, I just started collecting pieces I really liked. Craig's list, antique shops, flea markets, architectural salvage shops, thrift shops, cast-offs from family. 

I had a lot of pieces, but the theme wasn't unified yet. Living in Florida, so near the Atlantic and beautiful pieces, I wanted a coastal theme, but without all the beach motifs. So, I elected to create this through color. I have my own fabric collection printed through Spoonflower and this provided the jumping off point for developing the theme. I started painting furniture and it wasn't until I bought a dark turquoise dresser off Craig's list that the theme really started to emerge. The coastal theme I wanted to pull off emerged through using blues in all different hues and tints, just like the water. I add splashes of green to break it up and crisp whites to offset it, as well as contrasting browns. 


A vintage window as decoration on top of my hutch. I just finished painting this hutch an Annie Sloan duck egg blue and old white. I love how this turned out. The primitive hutch was a perfect match for the paint. The paint highlights the beautiful texture of the old wood. The hutch actually has doors on it, but I liked the hutch better right now with the doors off. 


I still have some tweaking to do with how the supplies are organized, but the organization items are from Hobby Lobby. I have been eyeing up these different small storage bins and they are perfect for craft supplies. They recently had all of these bins for 50% off so I snagged several different ones. I like that every piece is different which adds character to the storage. I'm not really a matchy matchy type of person. I found some pieces from antique shops like the vintage yellow tool drawer in the bottom left below. I also really love the wire bins for visibility from Magnolia Market (Joanna Gaines from Fixer Upper's online shop), although the bins I liked the most are apparently sold out. These will be great if I start doing shows or have a little booth somewhere.

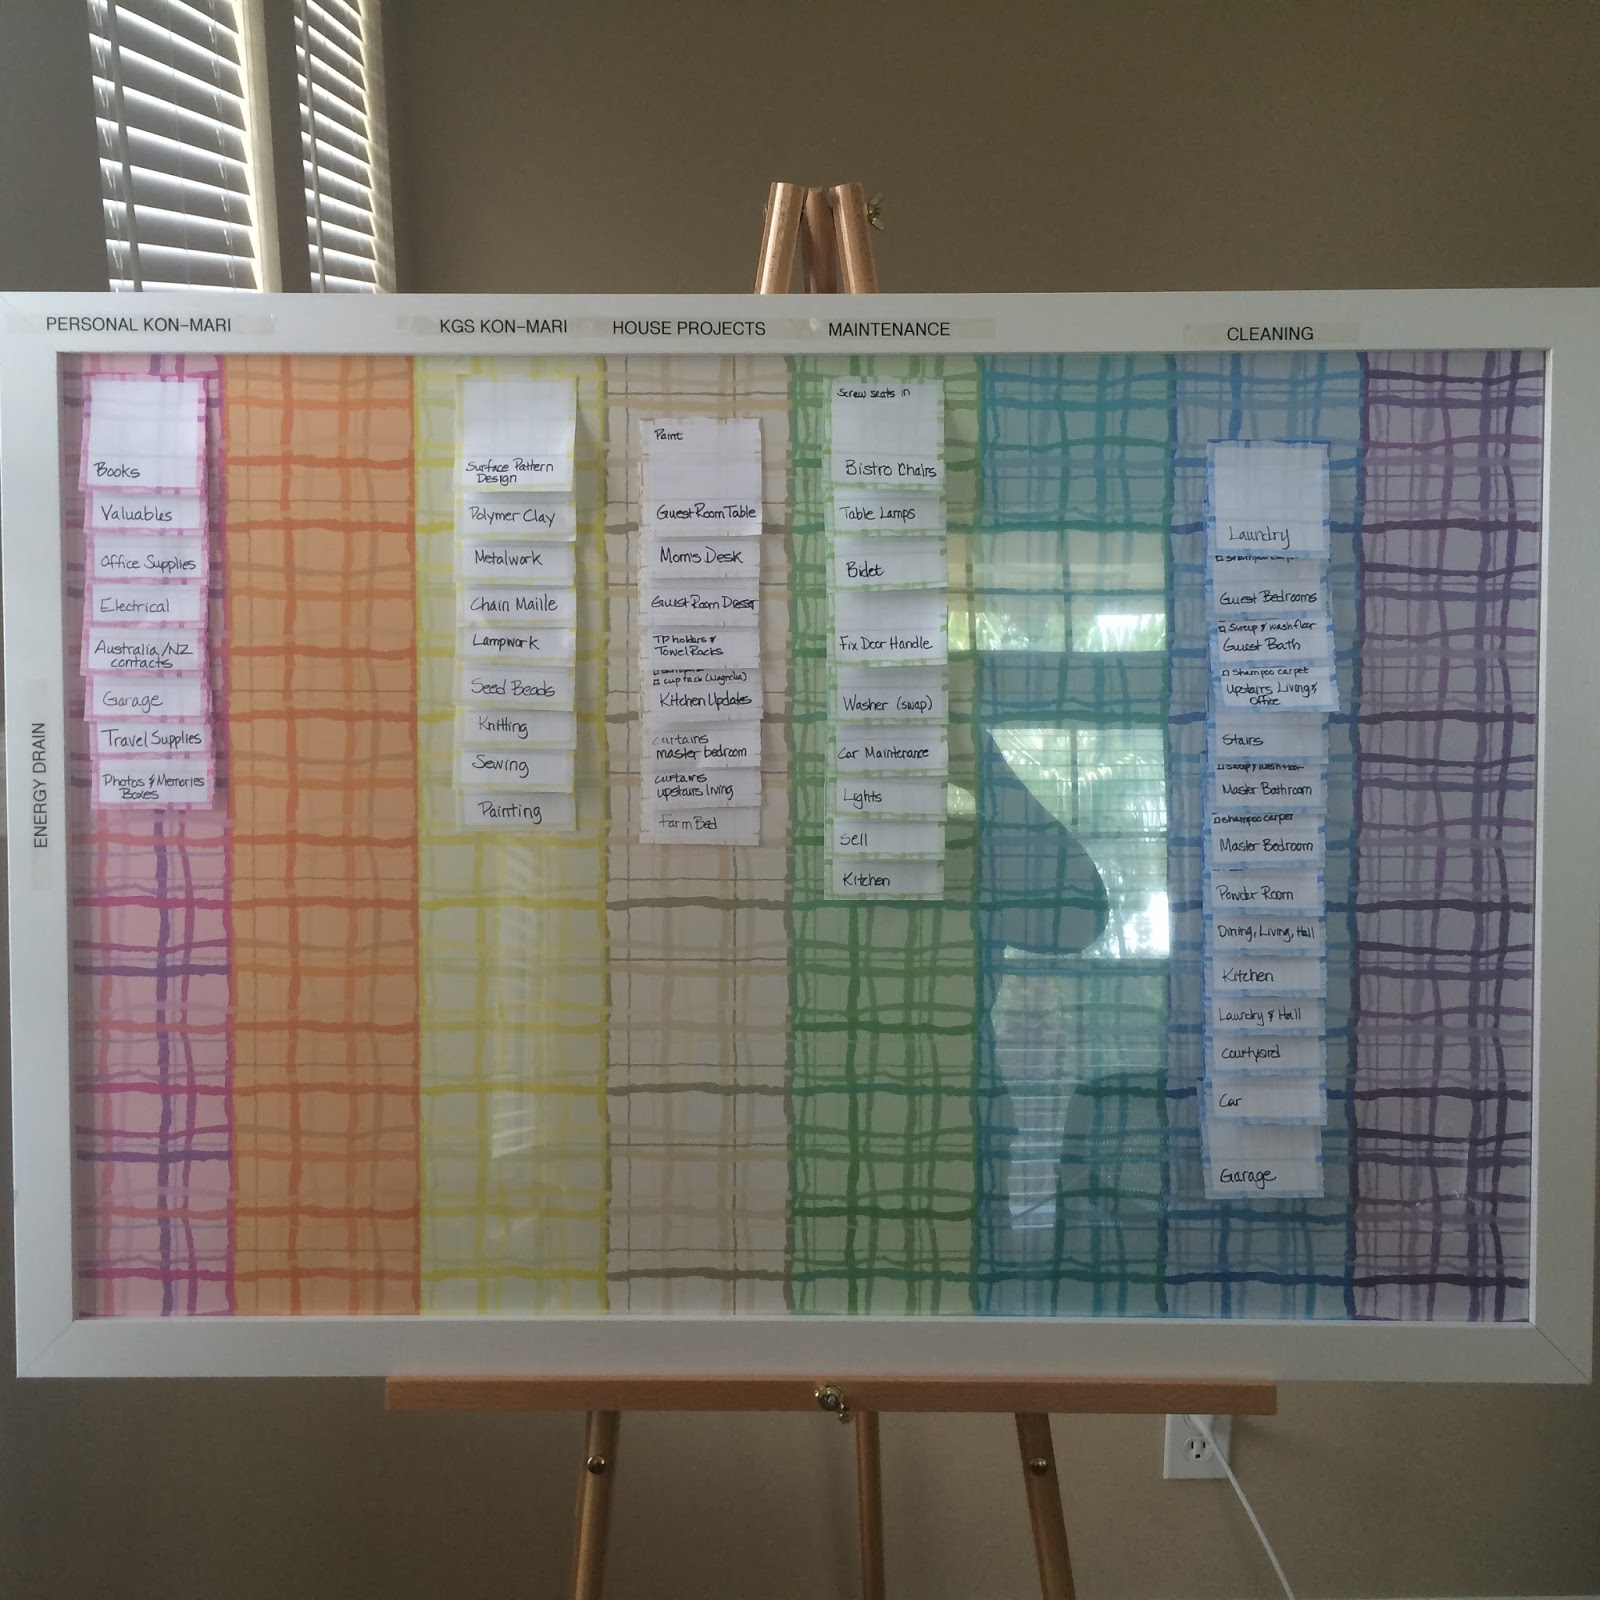
From an organization perspective, I used the KonMari method (wow! I wrote that post six months ago!!! that's how long this process has been going on) for organizing my supplies. I need to get my label maker and then everything will be super organized and findable. I've been trying to keep negative space between the different organizing bins. I find it easier and more pleasant on the eyes when it's not all crammed together and on top of each other. Which means I still have some editing and reducing to do.


I found a punched tin mirror, which is one of the items I missed from my Texas style. The bistro set is from an antique shop in Kansas. I recovered the chairs with my own fabric and spray painted. The kiln is on a rusted out typing table that I found at the flea market for $10. The locker basket below the kiln is another Magnolia Market find. The Island Time sign is a $10 find from the flea market.


The table below is an English pub table. While I love the dark wood, it was really weighing down the space. So I painted the bottom a pale green (hard to see in this photo). I recovered the six chairs that came with it with my own fabric and painted them white. I put two chairs up in one of the guest rooms and then balanced this table with an eclectic inclusion of Spanish style leather chairs that I found at an architectural salvage company. I'd really like a bigger table for this space, but for now, this is perfect.


The cream couch is a $75 find at the thrift store. It was in excellent condition and makes a nice space for contemplation and relaxation. The side table was a beautiful piece from an antique store in Florence, SC. I painted it this bright turquoise and now the multiple shades of blue make more sense in this space.


The bright green dresser was another Craig's list find. It houses all of my shipping materials.


And now I have a studio space that is conducive for creating!

Monday, January 11, 2016

Effectively Organized: Setting up the studio

I went dark again! I switched roles at my day job and that has been consuming a lot of my time and energy. I also decided I wasn't motivated the way my studio was currently set up. Everything in this space is tan/beige. At night it feels dark and closed in. So, I decided I needed my studio bright and inviting. So, I dove into painting all the furniture into light and bright and motivating (to me) colors. Blues, whites, and greens. 

The dark furniture was really heavy. 


Vintage white and Charleston blue. 


Work in progress and starting to stock the shelves. I'm in the process of sorting out what I can still do as a renter in my current studio and what I need to put away until I move into a house I own.


More work in progress. Found some fabulous leather Spanish style chairs at a cool architectural salvage place up in Jacksonville.


Significant progress! Table is almost done. I just wiped down the top with mineral spirits. Will need to varnish it tomorrow.

I really love the chairs! I reupholstered these with my own fabric. It's a fun bohemian look with different patterns in the same color way.

I'm also trying to make the storage on the shelves attractive and practical. I've been obsessing over Fixer Upper and the farmhouse, industrial, shabby chic vibe. So, I've been checking out the cool architectural salvage, antique shops, flea markets, and the craft stores for items for storage and it's all coming together.


I need to take pictures during the day so the colors show up better, but in a way, I like the evening pictures... this is the light I spend doing my art, so now you see why I needed a brighter, lighter environment. I have more plans for painting and organizing and it's coming along! Yay!

Wednesday, October 14, 2015

Effectively Focused: 8 - Review

Previous Post - 7: Flex - acknowledge changes and adjust


Principle #8: Review

At the end of your self-defined window of time, you take some time to reflect (ideally with your support team), figure out what’s working, what isn’t, think of ways to make it work for you.

At the end of every time box, reflecting on your progress continuously and how you can continue to improve, estimate more accurately, figure out what works for you, what doesn’t. Rework your art. Rework your progress board. How often have you had to change priorities.


Tweak the System

Another area that is ripe for change and adaptation is this process itself! You don’t like sticky notes? Try note cards. Maybe you like technology better than sticky notes? There are a whole host of tools like Trello, Rally, VersionOne, LeanKit, that mimic the paper version. (You can look up Scrum or Agile tools and find a whole host of tools with free subscriptions for individuals.) Maybe this process doesn't quite work for you or sort of does, but you still need a little better task management with a virtual team, so a tool like Asana for virtual team and sticky notes for personal work might be best. Or create your own art and sticky notes. You don’t like coordinating the sticky notes? Mix ‘em up? The whole process is up for grabs for you to tweak and adjust until you are happy with it.


Beyond this system

It might even worth the time to set up a regular (quarterly?) review of your overall business and make sure everything is still working for you. 


  • Does this still work?
  • Is my pricing strategy still working?
  • Is my shipping process efficient?
  • Etc.


Grow the System

If your business grows, you start planning for a large order, a show, or you have some kind of large influx of business, you may need to make modifications to grow this system. If you get to a point where you feel angst and stress, maybe you're finding you have outgrown the system. If you get to this point, let me know! This is great "problem" to have. We can figure out ways to grow the system to meet your new news. This process works with teams of 10 to organizations of 100's.


Changing the System


Nothing in here is required. These are merely a set of guidelines we use (with adaptation) in corporate project management. This process has been adapted to work for the individual and personal time management. I am personally always adapting to see what works best for me and for the teams I work with. The same goes with this system for you. Do what works best for you!

Wherever you are at right now, just take time to sit and think about your feelings towards the process. Do you still feel comfortable? If so, great! Maybe the changes only need to be minor, if at all. 

If you are feeling angst or stress, try to pinpoint what makes you uncomfortable and try some things to change it. It is possible you need make changes: this process is geared to a small scale and maybe you need to figure out how to grow this to handle bigger projects. We run into this same issue technically. You never know until you move forward. Sometimes we know more when we get into the process and if we DID go down a wrong path, we'll take some time to "refactor" (or redo). You know the best for you.


You did it! Are you going in the right direction?

Are you still aligned with your company Mission and Vision? Do you have a Mission and Vision for the product itself? Is the product and your company still aligned? Are you Life Priorities being impacted by your work? If so, are there some adjustments you can make in your work habits to maintain your Life Priorities? Or is hyper-focus and extra time acceptable to your family while you are launching your Product?

Take a few minutes to celebrate your forward movement! You did it! Reward yourself with one of your fun ideas. Take a breather to rejuvenate, get yourself ready and move forward.


Plateauing

At 2 months, we start grooving along, at 5-6 months, we plateau. Either it's getting stale, boring, rote or we're running into real technical problems that the process can't solve. This is when angst, discord, frustration starts manifesting itself on the team. In the case of art, it would be with creative or process issues. Or growing pains! Try to get into a pattern of constantly renewing, revamping, and trying new things at the end of each time box.

Sometimes I let the discordant feelings sit with my teams. Sometimes I look for ways to shake things up. It depends. But one thing important to note: there is never a "destination" in this process. It's always a journey of constantly trying and tweaking.


Thank you for following along in the basic process of using Sticky Note PM (aka Personal Kanban) for your processes. I will continue to talk about Agile and different aspects of it in the creative environment in future posts.


Table of Contents for the Sticky Note PM Program

Monday, October 12, 2015

Effectively Organized: Organizing my work to produce a collection

I'm winding up to release Texture and Patina collection.  They are out there in bits and pieces in my shops, but I'm getting more organized for a bi-weekly release of 8 different colors of 12 different patterns. I'm biting my nails and getting all of the administrative pieces in place before I start the launch.

But before the launch, I thought I would share a bit of my process and how I organized the creation of this particular collection. I actually made so much art and didn't use a lot of it, that I'll have a great foundation when I start a new collection. Now I just have to make sure the sketches fit a future collection. Or maybe I'll have a spin-off collection. Hm....

But in the meantime, here is a picture of the pile of papers I sketched and doodled and marked. This is a nice 2-3 inch thick set of folders and papers.


I organically created a system (I love systems) as I progressed through creating this particular collection. I created color palettes and hung papers on walls to get ideas. I think I marinated in the ideas for a good 3 days before I started putting pen to paper. 

Pen and paper vs. digital design

Regarding pen and paper, I find I prefer pen and paper to pure digital design. One of the ways I would describe my core style (at least at the moment) is primitive, organic and colorful. I am particularly enamored with Southwest design because I love the element of organic creation where you see the handwork of the person who made it. That's something I've wanted to preserve in my personal approach to design - my hand in the work. So I maintain my interest in starting the work in pen and paper, then I scan it and manipulate it digitally in Photoshop and Illustrator.

System for editing and choosing final designs

As I started sketching, I experimented with a wide array of ideas. I marked, I sketched, I incorporated Zentangle type doodling into my designs. I marked papers randomly and with different methods.


As I worked, I ended up with quite a pile of papers. I started losing track of what I liked and what I needed to put on hold. I decided I wanted to keep everything I created since it sometimes sparked ideas, but it just didn't necessarily make the final cut.

Also, I found I needed to to "put my drawings away" for a bit either in the folder or put a day or two of time between when I created and when I viewed it again. This allowed me some time to assess whether I really liked it or not. Below is the rough workflow I used for developing this collection and editing it out to the final designs.


Outtakes

And finally, here is a set of outtakes I really like, but didn't make it into this particular version of the collection. Actually, they were going to get included, but I pivoted on the collection and ended up recoloring some of the patterns to a beach theme. I expect to use these in the future. 


Wednesday, October 7, 2015

Effectively Focused: 7 - Flex

Previous Post - 6: Focus - hyper focus on one thing at a time, limit your work in progress and blockers


Ah, the realities of a solo artist/creative - big opportunities arise (a large wholesale order!), family crisis arise, a day job might still be a reality, balancing family needs, keeping yourself healthy - all of these will vie for your time. Another scenario that calls for flexibility is when you start developing on Idea that morphs into a better more effective Idea. Being flexible is a key, even if you have to change your ideas mid-stream. How do you adjust without losing the momentum caused by a change? 


Principle #7: Flex

Okay, now you've made your plans, and have started working them. But, as any experienced project manager knows, no plan survives first contact with implementation

One of of the surprising things about this type of project/task management is your ability to flex and change as needed. Most creatives resist organizing and planning because it feels so rigid and inflexible. Not Agile! In fact, one of the core tenets of the Agile Manifesto is "Responding to change over following a plan." Agile is designed to flex with reality, not box you into a corner.

While the overall goal is to complete work and not circle between multiple tasks (see last week's post on Focus,) Agile embraces your natural creative instincts to adjust with changes. The key to success is balancing the tension between your intuition and desire to do something new and intention complete work and put it out into the world. You get better with the tension the more you practice.


I use sticky notes even with writing this post and use them as bullet points for the keys I want to discuss. Being able to move these around and get a clearer sense of how to structure this post is very helpful.

Being able to change your Categories, Focus, Priorities is one of the beautiful things about this process. It's also why I prefer sticky notes over any other tool. Lists are too rigid. With the number of tasks I need to do, a list is outdated as soon as it's written. Digital is as flexible as sticky notes, but it doesn't have the power of being an always-visible reminder of what you need to do. 


Try and Modify 

Once you start something, don't feel too boxed in by what you've started. For example, when I broke my Energy Drain list (below) down into categories, I had four categories. As I started working my "plan" I realized I needed to break one of the categories down into two smaller categories. I plan my week out and my priorities change as the week progresses due to things that come up. Don't worry or overthink it. Just go with the flow.

Don't Overdo the Organization

One of the keys I want to emphasize in this context is don't overdo the organization. Yes, a Type A project manager just said that out loud. Because everything changes. It's really more important (and sometimes harder) to keep everything as simple as possible and no more complex than it needs to be. Complexity kills progress. Keep it as simple as possible but don't feel hemmed in either. Again, balance the tension between the paradoxical states. 


Maintain Momentum

Flexibility as a creative is an advantage and a flaw. It can be a flaw when you are subject to the Shiny New Object Syndrome. Playing with the next ideas leads to loss of focus on becoming really good at one or two things. Context switching and pursuing each new shiny idea really makes for multi-focus. If you multi-focus, pretty soon you end up with a lot of projects started and none finished. 

One of the key points is making sure you have everything written down. If you have to check out from your work for a bit to focus on a family emergency, a health crisis, or an element of your business that takes you away from new business development, having a point of reference is critical. If you maintain your project book or project queue with your Hyper Focus as tightly focused as possible (only one or two sticky notes), when you come back to it you have focus.

When you shift priorities and change up the Hyper Focus, it's good to do a review of your entire queue to make sure you are still focused on the right priority and you haven't forgotten anything. Reviewing and rearranging your sticky notes keeps everything percolating in your brain, without having to worry about forgetting it. This little bit of preparation saves you a lot of time in the long run and keeps you from spinning your wheels on all the ideas you have. Also, because it's written, you don't have to spend precious time remembering your ideas or worse, forget the fabulous idea and start working on the wrong priority.


Next Post - 8: Review - survey the time box of activities, what can you do differently next time?

Wednesday, September 30, 2015

Effectively Focused: 6 - Focus

Previous Post - 5: Time Box - identify a length of time you want to accomplish things


“People think focus means saying yes to the thing you've got to focus on. But that's not what it means at all. It means saying no to the hundred other good ideas that there are. You have to pick carefully. I'm actually as proud of the things we haven't done as the things I have done. Innovation is saying no to 1,000 things.” - Steve Jobs


Principle #6: Focus


One of the key principles in the Agile world is focusing on one thing at a time and finishing it. I read a term on someone's blog that really describes a piece of this method. She called it “Hyper-Focus.”


Hyper Focus

You have a Project Book and put one single sticky note on the front and work that until it’s done. Maybe you decide you can have more than one (as you might have to wait for something from someone else to move forward). The idea is, don’t put too much on your front page. Maybe even decided a maximum number of sticky notes you will allow on your front page (1, 2, maybe even 4), but by limiting and hyper-focusing, your time will be maximized.


Avoid Context Switching (Commonly Known as Multi-Tasking)

As any good administrative assistant, chef, or mom knows, multi-tasking is a critical survival skill. At it's simplest, multi-tasking involves setting a number of tasks in motion that require minimal attention. One task gets the focus. So, in it's most literal form, we only do one task at a time, while other tasks are set in motion behind the scenes. A virtuoso multi-tasker optimizes her workflow so she can seamlessly switch attention between tasks with minimal down time.

The switching attention from one task to another is the problem. The phrase "context switching" more accurately describes the real issues. In the multi-tasking scenario, it's usually switching between tasks that don't necessarily require full concentration. But there are many tasks we do today that require the majority of our concentration.

Knowledge work is something that is high in mental concentration. To be most efficient with your work, it's best to finish the task you are working on before moving on to something else. One way to manage that is to minimize the number of tasks you are focusing on (limit work in progress) before you start working on anything new.


Pomodoro Technique

Additional techniques like the Pomodoro technique can help you focus for short bursts of time (25 minutes with a 5 minute break)


Next Post - 7: Flex - acknowledge changes and adjust


Wednesday, September 23, 2015

Effectively Focused: 5 - Timebox

Previous Post - Summary of Principles 1-4


Principle #5: Time-box

What is a Time-Box? A length of time determined by you (or your team) of 1, 2, 3, or 4 weeks for getting a group of sticky notes done.

You may need to circle back to steps 1-4 to break your ideas down small enough to fit into a single week. The idea is breaking your work down into smaller, manageable, complete-able chunks of work. The only valuable idea is a finished one, and each step or chunk of work brings you closer to completion.


Bringing Work into the Time Box

Go through your list of priorities and pull into your Time Box the number of stickies you think you can get done. If necessary, you might need to break your stickies down into smaller chunks to fit in the Time Box. It's highly likely you will overestimate the amount of work you can get done. That's okay. As you start, you are learning how much you can do. Keep notes on your stickies as you work and move them to the Complete queue with notes. I find my teams never really get to super accurate estimating. I find I'm also not completely accurate in my personal estimating either. But that's part of a future Principle to Review and see what's working, what isn't and continuously tweak the process until it's a fine tuned machine. The goal is to get to consistent, somewhat predictable productivity over the long term based on past history.

The Progress Queue (Wall System)

You can customize the queue to what works best for you, but I usually have these four categories: Queue (list of work to be done in this Time Box), Pending (items that I started but are waiting on outside factors), In Progress, and Complete.


Progress Queue (Book System)

In the the portable book, I use the progress queue a little differently. I use the pink page as the queue of new work and pending items, the front page is the In Progress queue that I need to focus on immediately. At the back of the book is a Complete page where I collect the completed stickies with the notes on how long everything takes.


Optimal Time Box

I recommend one week as the optimal time box for checking progress and continuous adjustments of your overall process.

Ranges of time boxes: You can go up to two, three or four weeks if that cadence and rhythm just makes sense in your creative world. If you have an intense project and you need to see daily progress, you can even break your time boxes down into daily and measure your progress based on daily completion of tasks. Test out what cadence works best for you.


Regular Work Week 

If you're job is a regular 9-5 workweek, the reflexive action is to base your week on a Monday-Friday cadence. Go ahead and work within this framework if it makes sense. But consider some alternatives.


The Weekend Creative

If you doing your creative work as a side gig to your day job, it might make more sense to start your Time Box on a Friday or Monday. Personally, I've been starting mine on Mondays, allowing me a little work during the week and a big push on the weekend with a wrap-up of what I accomplished for the week on Sunday and prep for the next week on Sunday evening. However, I've been experimenting with starting my creative week on Fridays. Experiment each week with whatever day it makes sense for you to start your Time Box.


Mid-Week Start

Another alternative for when you start your creative week might be in the middle of the week. This is something we did on my corporate teams when we normally had one-two people out on Fridays and Mondays due to flex schedules, holidays, Personal Time Off, etc. If you have a more stable schedule where people aren't out of the office regularly on Friday or Monday, a Monday-Friday Time Box is fine. But, this might also fit your creative schedule.


Schedules

If you notice, there isn't a strict schedule and plan. It's actually a fairly loose weekly plan. In a creative sense, I find this framework is incredibly valuable. I arrange my work around the appointments and find the loose framework is so much more fun and valuable for the way I work in a creative sense.

If you must have a schedule, be careful not to over schedule yourself. Chaos has a tendency to feed creativity than than strict schedules. The beauty of this system is that it allows a lot of flexibility and freedom while still propelling you to completion on tasks. 

With that in mind, only schedule what you must schedule. For example:
  • Deadlines for contest submissions. You might have to "plan backward" and figure out pieces of work you must have done by each week. 
  • Appointments
  • Classes
  • Shows
  • Editorial schedule for social media - this item might even be a hybrid between scheduling blocks of regular time every week to make sure you get all of this done, while not being overly rigid.


Summary

  1. Determine your optimal time box for you (I recommend one week)
  2. From the priorities you have set, select a group of stickies you think can fit into your Time Box
  3. Break your work down to fit into the time box
  4. Start your time box on a day where you can maximize your work


Next Post - 6: Focus - hyper focus on one thing at a time, limit your work in progress and blockers